Peppermint Cream Recipe


Ever find you've baked a cake but end up with lots of icing left over? This happened to me at the weekend so I made some yummy peppermint creams. As children, my mum would let me and my sister make them with the left over icing pieces. 

Ingredients
- Roll out icing 
- Peppermint flavouring or essence
- Green dye (optional, preferable free from additives!)
- Icing powder
- Dark chocolate


Roll out the icing slightly and make a dip in the middle. Add in the peppermint essence/flavouring (about 2tsps per 100g icing) and colouring (see packet for guidance). Kneed the icing to mix in the peppermint and colouring. Roll out the icing on a clean dry board with a sprinkling of icing powder to stop it sticking. Make into shapes with cutters. Dust with icing powder a little to prevent them sticking! Let them sit for a few hours then melt some chocolate in a bowl and tip half of the creams in, then leave to dry on a baking rake. If you can resist eating them straight away, the taste even better after they've been left to harden!


I also made some delicious raspberry creams - same process with raspberry flavouring and red dye. If you'd like to make the icing from scratch use egg white and icing sugar - have a look on BBC Good Food website . 


Have fun!


Olympic Fever

Like the masses I've enjoyed the Olympics hugely and I was lucky enough to get tickets to watch swimming at the Olympic park. We watched heats for the men's 1500m, women's 50m, men's and women's relay teams. The atmosphere was amazing throughout every race, especially as the GB relay team won their heat into the final. Here's a few pictures of my day at the Olympics..

 On the way into the park


 Inside the aquatics centre waiting for the first swim (quite far back!)


Lots of flags waving for the GB swimmers


 Me outside the aquatics centre

Blogging....

I've been a bit quiet on the blogging front of late due to personal reasons but now it's time to get back into it.....so expect some upcoming blogs on my favourite places, olympic fever, maxi skirts, holidaying, my latest craft projects and more...and while I write them I'll try not to get too distracted by thecatapi - love it or hate it cat pics guaranteed to make you smile


My Jamie Oliver Recipe Experience Part Two..

Fish tray-bake with Jersey Royals, Salsa verde and simple spinach salad.

Another try out of a Jamie Olivers 30 minute meal which again made a delicious meal. I played the video in the background and got all the ingredients ready at the start. I wasn't so sure about the side orders (someone doesn’t like jersey royal potatoes and I don’t have a food processor to make the salsa verde) so we used sides from other Jamie recipes we've made so it was…

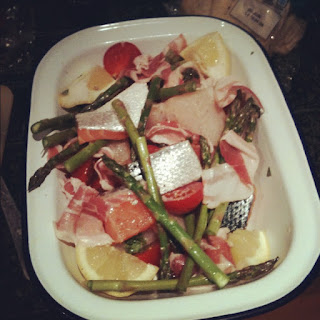
Fish tray-bake with simple spinach salad, flatbreads and pomegranate drink.  


Fish tray bake: I used Salmon and River Cobbler from the local supermarket. In the tray (I used one of my favourite melamine dishes) I just chucked in all the ingredients (minus a few that Jamie uses) – cut up chunks of fish, Asparagus (with wooden ends snapped off), Lemons (in quarters), Baby tomatoes, pancetta, Garlic, pepper, basic leaves and olive oil. Mix it all up then arrange it so that it is evenly mixed with the fish skins facing upwards and lemons are in the corners. Cook in the oven. 


Flatbreads: As per my previous post I made some flatbreads. I love these…..so tasty. Scrunch up and wet a large piece of greaseproof paper then open it up. Place on the flatbreads, drizzle with olive oil and sprinkle with herbs (today I used Thyme and oregano). Wrap up the flatbreads and pop in the oven to warm up.

Spinach Salad: Using a selection of 'leaves' - spinach, rocket and watercress, chopped fresh tomatoes and drizzled with lemon juice and balsamic vinegar


Pomegranate drink: In a large jug I added ice, the juice of two pomegranates, some slightly flat lemonade (fizzy water would do), a little bit of lemon juice, mint leaves and stirred. Taste and adjust amounts. 


Here’s the link to the episode on 4od and the recipe is in Jamie's 30-Minute Meals: A Revolutionary Approach to Cooking Good Food Fast


Jubilee Fun


I'm not going to hide it - I'm a big fan of the Royal Family. I like how the country comes together and celebrates...for a few days the mood of the country lifts as the news is full of positivity (well mostly). Okay so we might question the royal family sometimes...the use of tax payers money by certain members but then I look at the good that they do, their independent work Princes Trust, Duchy originals...


Last year I enjoyed the royal wedding celebrations on the big screen at Hyde Park. This year, a bit tired after the dot-to-dot festival (my next blog piece coming up) I had afternoon tea, followed by champagne while watching the jubilee concert on the box. 


Crochet an Owl


The most adorable little owl I made for a birthday present. I've just started to learn how to crochet and the little owl is my second attempt at making something. Once I got over looking at the daunting instructions and the many different patterns I managed to learn a few basic stitches - chains, slip stitches, double crochet. I found the easiest way to do this was looking at youtube videos and I brought a book The Essential Handbook of Crochet Stitches . I decided the best thing would be to get on and just make something! My first project is something much simpler (It's not yet finished but I'll post it when I do!). Then I came across this lovely owl by Zoom Yummy found here. The pattern is available on etsy at a bargain cost. Great instructions - picture by picture which I think is definitely needed for a beginner!. The pattern is in American (yes american and english have different names for the stitches to make things more complicated!). Seemed easy to convert - ch (Chain Stitch) and Sl St (Slip Stitch) are the same, sc (single crochet stitch) is dc (double crochet), hdc (half double crochet stitch) is htr (half a treble). Now I'm off to make another one under request..


Summer Dresses

It's that time of year...the sun is finally out! Okay it might not stay yet but it's definitely time to think about summer dresses....Here are my favourite spots so far and yes I will resist buying them all!!


The dress for the beach or the park


tumblr


Simple, light and cool for the summer.
(Don't know the brand but found pic on tumblr)
I have a similar one from Miss Selfridge white cutwork dress


The dress for a wonder around town....


I love the white embroidery stitching 
(Photographed & written on this lovely blog by Vanessa Jackson 
Possibly from H&M or Zara) 


The dress that's slightly quirky....


I love a slightly different dress - 
the colour, the pattern or the design (never all at once!!)
From anthropologie (at £128!)


The dress for any occasion....


I'm really enjoying wearing this maxi dress I brought from Mango.
I need it tucked in at the waist to suit my figure (wide hips and small waist)
so this one is a perfect fit and has a splash of summery colours


and now I'm mad about long skirts for the office as well as my never changing 
love of floral prints but that's for another time!

Yarn Wrapped Words


I love these yarn wrapped words that are around at the moment. Full of endless possibilities....jewellery, home decoration..I thought it would make a nice addition to my office cork board that needs a refresh. I choice the word 'flora' but any word that can be written in joined up handwriting would work well. Here's how my attempt went..

What's needed:
  • Wire - I used some cheap general purpose gardening wire but any flexible wire such as coathanger, pipecleaners would do
  • Thread - I used two coloured twine brought from a lovely craft shop in Bath indoor market. Any embroidery thread or wool would do. The brighter the more effective!
  • Wire Cutters
  • Glue
Start by writing out the word in joined up handwriting on paper. Bend the wire to form the word, using the handwritten word as a guide. 


Tie the thread around the wire, tucking the end underneath to start. When the  wires cross, wrap the yarn around both to hold the letters in place. 


Wrap the thread around the whole word then make a knot to secure. I carefully put a drop of glue on the ends to stop the wrapped threads becoming loose. 


Owl Bunting


My latest craft project :-) I've slowly been making owl bunting for the new office at work - in my obsession with owls! Inspiration for the owls came from a photo on 'Chocolate fishies' blog and those sold by 'Missy Mack' on etsy. Here's how I made it....

Materials:
Material -for the owl and for the tum
Thread
Felt
Buttons
Brown embroidery thread

Step One: Cutting the fabric
Make two paper templates - A) the main owl body (adding at 1 cm around the edge) and B) the smaller tummy. Pin on to material and use as a template. Each owl needs two A's and one B. 


Step Two: Adding the features 
Stitch on the tummy – about 2cm from the bottom of the owl. 

Add some eyes – I used a larger cream felt and some funky buttons.


Step Three: Sewing the Owl together 
Pin the two pieces of material together (outside facing inwards) and sew around the edge except the bottom. Now pull the owl inside out – it’s easier if the top point is cut flat and the slits made around the edges.


Step Four: Final touches
Slip stitch the bottom together. Now sew on the nose – I used brown embroidery thread. Fold over the beak and slip stitch in place (hidden )


Step Five: Make the bunting
 Thread through the cord and add all the owls! Owl bunting made!!


Bank holiday relaxation

We took advantage of a break in the rain to venture to Cotswold Wildlife Park this bank holiday weekend.....

Sunbathing in the Madagascar walkway

Being greeted..

What you looking at?

Review? Great for getting close up to animals and plenty to see. Not so great for food.....so we had a pot of delicious tea & scones at huffkins in the pretty medieval Cotswold town, Burford 


Oh and while it rained? Pieminister at St Nics market, reading salmon fishing in the yemen and trying to learn how to crochet..and now back to work..

Photographs

I'm a bit of a fan of using phone photography apps Instagram and Camera+. The ability to improve my photographs (they need it!) is brillant. Here's a few I've done....


 Anthropologie bowls


 My Dad's childhood teddy


 Valentines Rose


 Botanical books


 Bow Shoes (Dune)


Anthropologie tea cup


T-Shirt Bracelet Tutorial

I came across some lovely bracelets made from plaited t-shirts (various variations on pinterest most notably from the henryhappened.com and cutoutandkeep) so thought I'd give it a go. Once I played around with how to make them they were very easy and quick. 


Here's how I made mine...

Ingredients

  • - T-shirt strips - I had some already cut up from an old necklace but if not find a jersey t-shirt you don't mind cutting up. 
  • Cord (or ribbon)
  • Thin bendable wire (I used 28 gauge beading wire)
  • Glue

How to

  • If you need to cut up the t-shirt into three strips, about 2cm/0.5-1inch wide and 30cm/12inches long. 
  • Cut the cord into three 28cm/11inch pieces
  • Hold the ends together, with the cord slightly higher
  • Wind the wire around the ends to hold the cord and t-shirt strips together and in place
  • Separate into three groups and plait
  • Plait until it's the right length around your wrist. I have made mine to pull over my hand. 
  • Wind wires around the ends and cut off the excess cord and t-shirt strips
  • With the wire, continue winding around both ends to bind them together
  • Cut a piece of fabric to cover the ends and wire.  Fold the fabric over and wrap around the ends, glue in place.

  •  Leave to dry then it's ready to wear! Enjoy!